PHOTO · CROP · COLORS · GRAPH

Photo to Crochet Pattern
Converter.

Turn your favorite photos, drawings, and logos into editable crochet colorwork graphs. Choose your stitch count, reduce yarn colors, preview each row, and download a printable crochet chart — free and directly in your browser.

Free converter & downloads Processed in your browser
Photo → crochet graphFREE
Opening your saved graph…
Photo conversion and graph controls

Upload a photo

JPG, PNG, or WebP · under 10 MB · processed in your browser

Photos stay in your browser. Nothing is uploaded. Edit stitches after conversion — the graph is yours to fix.

This browser keeps only your latest photo graph. The original photo is not stored. Converting again or clearing replaces the draft. Download PNG/PDF to keep a copy; downloads cannot be reopened here for editing.

FROM PHOTO TO HOOK

How to Convert a Picture into a Crochet Pattern

From your photo to a printable chart in four steps.
STEP 1

Upload Your Photo

Choose a clear JPG, PNG, or WebP — a drawing, logo, or photo with a simple subject works best. Everything is processed in your browser; the file is not sent to a server.

No photo handy? Try a free heart, flower, pet, or logo sample. Convert it, edit the stitches, then download your chart.

STEP 2

Choose Stitch Count and Colors

Set how many stitches wide the chart should be (default 60). Row height follows your crop and optional gauge so single crochet stitches are not stretched like square pixels.

Pick a maximum yarn color count (2–16, default 6). Turn dithering on only if you want softer gradients; leave it off for cleaner color blocks that are easier to crochet.

STEP 3

Edit Your Crochet Graph

Use the draw, fill, and erase tools to fix edges in your chart. Merge similar colors and remove stray stitches to reduce yarn changes.

Watch stitch counts and the live row preview (flat single crochet, bottom row first, alternating direction) while you tidy the chart.

STEP 4

Download Your Printable Chart

Download a PNG overview or a printable PDF with numbered chart pages (up to 40 stitches per side), a color legend, and stitch counts. For each color’s stitch count within a row, check the on-screen row preview.

This is a crochet colorwork graph (one square = one single crochet in US terms), not a full written amigurumi pattern or step-by-step C2C instructions.

Prefer drawing from scratch? Open the free crochet pattern generator on the homepage. For lace mesh charts, use the filet crochet pattern generator.

BEFORE YOU CONVERT

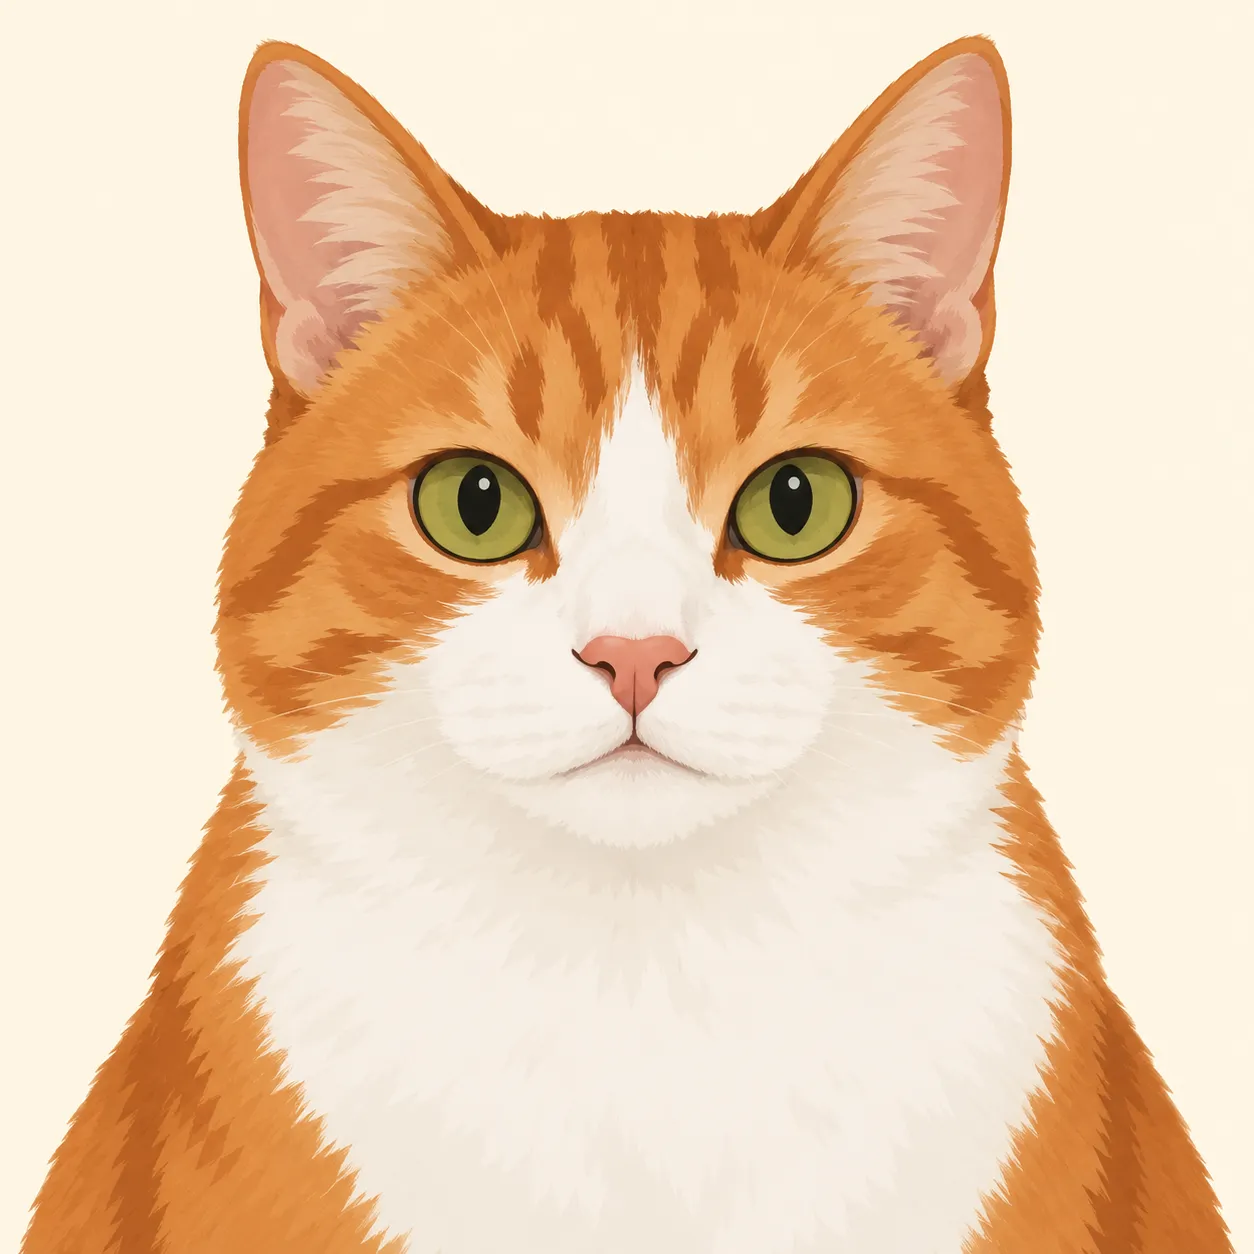
Keep the face. Lose the background.

AI-generated orange-and-white cat illustration used to practice choosing a clear subject
AI-generated pet illustration — a source-image exercise, not a real pet photograph or finished crochet piece.

Start with a tight crop, not more colors

Keep both ears and the chin inside the crop. Let the face occupy most of the image; a large empty border spends stitches on the background instead of the eyes.

For a first attempt, try 60 stitches wide, 6 colors, dithering off. These are starting settings, not a guarantee that every portrait will stay recognizable.

Compare one setting at a time

  1. Keep the crop and 6 colors fixed. Compare 40, 60, and 80 stitches wide.
  2. Choose the smallest chart that keeps the eyes and muzzle distinct.
  3. At that width, compare 4 and 6 colors. Keep extra shades only if they preserve a useful detail.

At the same proportions and gauge, doubling the width roughly quadruples the number of stitches. More detail means a larger project, not just a sharper preview.

Try these settings in the converter →

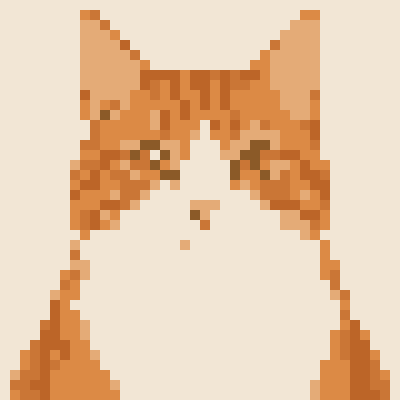
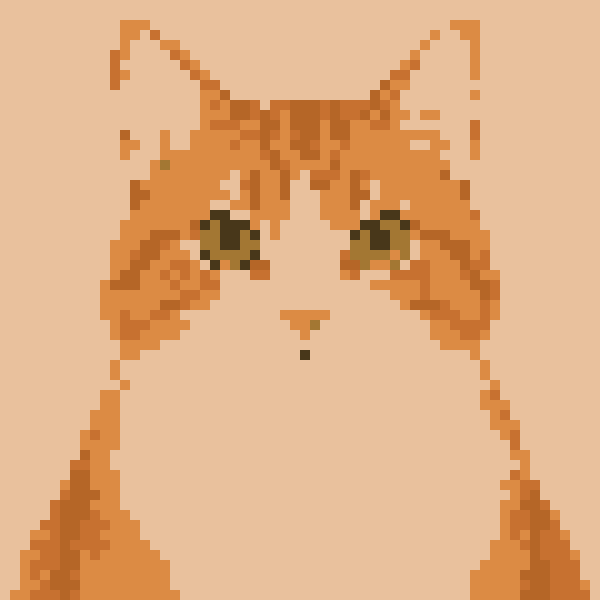
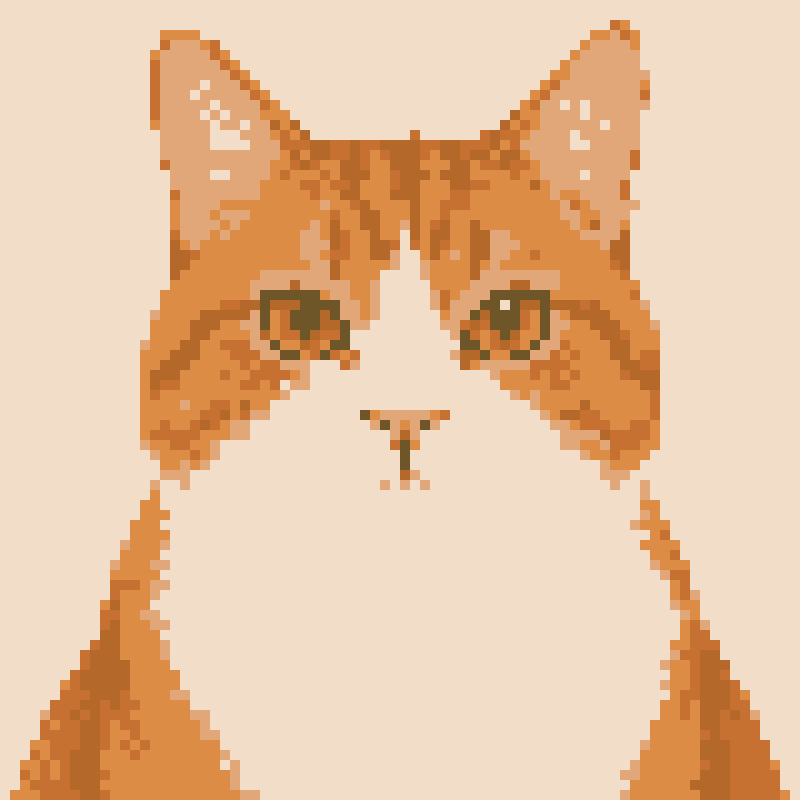
Same illustration, three stitch counts

Actual outputs from this converter’s core algorithm: full image, maximum 6 colors, dithering off, no gauge correction. These previews show color blocks, not yarn texture. Compare the eyes, cheek edges, and forehead markings.

Cat illustration converted at 40 stitches wide with a maximum of 6 colors
40 stitches wide
Same source, crop, and color limit.
Cat illustration converted at 60 stitches wide with a maximum of 6 colors
60 stitches wide
Same source, crop, and color limit.
Cat illustration converted at 80 stitches wide with a maximum of 6 colors
80 stitches wide
Same source, crop, and color limit.
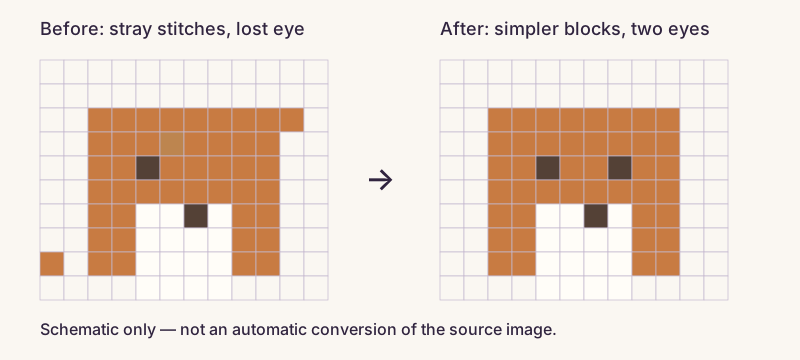
Two teaching grids show isolated orange stitches removed, a similar shade merged, and a missing eye restored
Hand-drawn teaching grids, not conversion results from the cat illustration. Fix identifying features first, then remove stray stitches and merge unnecessary shades.
YOUR PHOTO, STITCH BY STITCH

Turn an Image into a Crochet Graph

Your photo becomes a chart with a small set of yarn colors. Each square represents one single crochet stitch (US terms). Use it for flat colorwork; it does not include shaping or assembly instructions for a 3D toy.

You choose width in stitches (for example 60). Height is calculated from the cropped image proportions. When stitches are square on screen but not in yarn, enter gauge so the row count matches real single crochet fabric instead of a stretched rectangle.

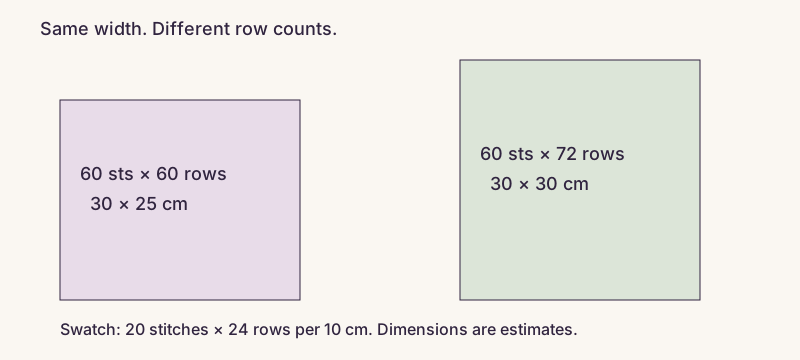
Gauge example (why row count changes)

Suppose your swatch is 20 stitches and 24 rows per 10 cm. One stitch is about 0.5 cm wide and one row about 0.42 cm tall. For a square photo at 60 stitches wide, the converter aims for about 72 rows so the finished panel is roughly 30 × 30 cm — not 60 × 60 “square pixels.”

At 20 stitches and 24 rows per 10 cm, 60 by 60 stitches makes a 30 by 25 cm panel; 60 stitches by 72 rows makes a 30 cm square
Width in cm = stitches ÷ stitch gauge × 10. Height in cm = rows ÷ row gauge × 10. Use gauge measured per 10 cm.

Leave gauge blank if you have not swatched yet; height then follows the image aspect with square cells. Finished size is always an estimate: yarn, hook, and tension still decide the real piece.

After conversion, the photo is only a starting point. The editable graph is what you crochet from. Merge muddy colors, delete speckles, and redraw eyes or letter edges so the chart is pleasant to work, not only pretty on screen.

STITCHES, COLORS & DETAILS

Customize Your Crochet Graph

Stitch count

Wider graphs keep more detail but take longer to crochet and need more yarn changes on busy photos. Start around 40–80 stitches for motifs and logos; go higher only when fine edges (text, whiskers) still disappear after cleanup.

Color count

More colors look closer to the photo and mean more ends to weave. Six colors is a solid default for portraits; drop to 2–4 for bold graphics; push toward 12 only when shading matters more than speed.

Cleanup tools

Merge similar colors, remove stray stitches, and draw or fill areas to reduce yarn changes. If cleanup removes a detail you want to keep, choose Undo.

Dithering

Dithering mixes small dots of color to soften transitions in sky or fur. It also adds yarn changes. Leave it off for larger, easier-to-crochet color blocks.

Starting settings by image type

Keep dithering off for the first pass. Adjust these ranges after checking the smallest important detail.

SourceWidthColorsCheck first
Logo or bold drawing40–60 sts2–4Letter gaps and thin outlines. Enlarge or simplify tiny text.
Pet illustration60–80 sts4–6Both eyes, nose, and ear silhouette remain separate.
Pet or human photo60–100 sts6–8Crop tightly; check face shadows before adding more colors.

These are trial settings, not measured quality thresholds. A distant face or low-contrast photo may still need a different source image.

FLAT SINGLE CROCHET COLORWORK

How to Read Your Photo Crochet Graph

This converter targets flat single crochet colorwork: one grid square = one stitch color. Rows count from the bottom of the chart upward. On odd rows you typically work right to left; even rows reverse — the same convention many printed graphs use for panels worked back and forth.

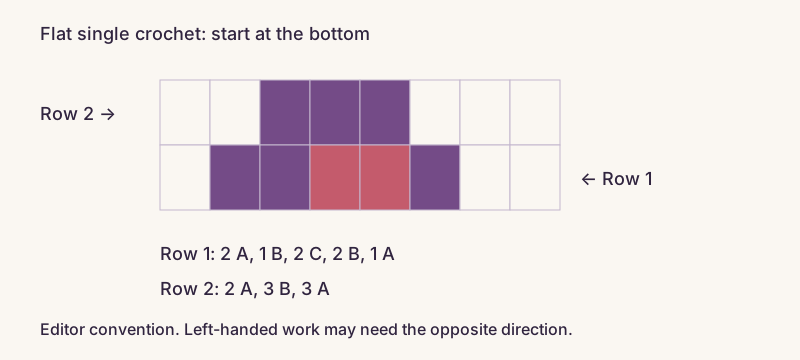
Mini example (8 stitches × 2 rows)

Colors: A (#F4F0E8), B (#744B87), C (#C45B6C). The editor’s live row preview uses the same bottom-up, alternating-direction rule for your full graph. PDF and PNG exports include the color chart and legend; they do not print every row as written stitch text.

  1. Row 1 (right → left)2 A, 1 B, 2 C, 2 B, 1 A
  2. Row 2 (left → right)2 A, 3 B, 3 A

The row preview shows the color sequence for flat single crochet. It does not include turning chains, borders, or joining instructions. The PDF contains the chart rather than written instructions for each row. Check your gauge before planning yarn quantities.

Read the bottom row right to left: 2 A, 1 B, 2 C, 2 B, 1 A. Read row two left to right: 2 A, 3 B, 3 A.
Bottom row is crochet row 1. A is cream, B purple, C pink. This is the editor’s direction convention; left-handed work may need the opposite direction.
PRINT YOUR CHART

Download a Printable Crochet Pattern PDF

Download your chart as a free printable PDF with an overview page, color legend, stitch counts per color, and numbered chart pages (up to 40 stitches per side). Print at 100% / actual size so column and row numbers stay readable on large graphs.

PNG is handy for phones and quick reference on the sofa. Both formats are visual charts with a grid, legend, and stitch counts, not written row-by-row instructions. The on-screen row preview shows how many stitches to work in each color, such as “12 A, 8 B.” Neither download can be reopened here for editing — keep the graph saved in this browser while you still need to tweak stitches.

The PDF includes stitch counts, but not yarn quantities. Use your gauge swatch and chosen yarn to estimate how much you need.

PHOTO TO CROCHET PATTERN

Tips for Better Photo-to-Crochet Results

Good source photos beat clever settings. The converter can only keep detail that is large and high-contrast enough to survive becoming stitches.

  • Fill the frame. A subject that is small in a busy room becomes noise on the grid; crop so the motif uses most of the stitches.
  • Simplify the background. Soft or solid backgrounds keep the palette for the subject instead of flooring and furniture.
  • Raise contrast first. Flat phone photos blur edges; a quick contrast bump before upload makes outlines land on cleaner stitch boundaries.
  • Start with fewer colors. Add colors only when eyes, lettering, or a logo edge still disappear — every extra swatch is more yarn changes.
  • Edit after convert. Zoom in and fix faces, text, and outlines by hand. Small details, such as a highlight in an eye, may need a few stitches added back.
  • Pet portraits: Use a large, well-lit face, about 60 stitches wide and ~6 colors, then rebuild eyes and nose with the pencil. Tiny pets on couches rarely survive.
  • Logos and drawings: Flat graphics convert cleanly at 2–4 colors. Turn dithering off and merge near-blacks so letterforms stay blocky and tapestry-friendly.
WHEN THE FIRST PASS DOES NOT WORK

Fix the chart before picking up your hook

The eyes or lettering disappear

The feature occupies too few stitches or blends into a nearby shade.

Try this: Crop tighter first. Then increase width or redraw the detail. Adding colors alone cannot restore missing resolution.

The face looks muddy

The background and shadows consume colors needed for facial features.

Try this: Simplify the background before upload and improve contrast gently. Merge similar shades only after checking the eyes and muzzle.

There are too many isolated stitches

Dithering or fine fur creates scattered color changes.

Try this: Turn dithering off and convert again before hand-editing. Replace unimportant single stitches with the surrounding color.

Curves look like stair steps

A stitch grid cannot preserve every smooth edge at a small width.

Try this: Judge the chart zoomed out. Increase width if the silhouette suffers; avoid adding random edge colors just to smooth the screen preview.

The finished face looks stretched

Real stitches are not necessarily square like screen cells.

Try this: Measure a swatch in the intended yarn and technique, enter stitch and row gauge, then reconvert. Check the new row count before editing.

Match yarn by contrast, not just the screen color

The palette contains digital colors, not yarn-brand matches. Compare real yarns together in daylight. Keep the light, middle, and dark shades visibly distinct; two similar skeins may erase a detail that looks clear on screen.

Stitch counts are not yarn quantities. For a rough estimate, weigh a swatch made in the same technique and divide its weight by its stitch count. Multiply by your planned stitch count, then allow extra for tails, carried yarn, borders, and a safety margin. Small color areas and carried strands make per-color estimates less reliable.

ORIGINAL → CROCHET GRAPH

Photo to Crochet Pattern Examples

Built-in samples you can load into the converter.
Compare the source idea to the editable stitch graph after you hit Convert.

Heart motif

Source: High-contrast heart on a plain ground.

After convert: 2–4 colors, smooth curves after a light pencil pass.

Best first conversion — little cleanup.

High contrast shape — easy first conversion.

Garden flower

Source: Bold petals and a simple stem.

After convert: Merge close pinks; try dithering off for blocky petals.

Good practice for color merge.

A few bold colors for a small panel graph.

Pet portrait

Source: Soft fur shapes and a centered face.

After convert: ~60 sts wide, ~6 colors; rebuild eyes by hand.

Remove stray stitches to simplify the fur.

Soft shapes; try 6–8 colors and clean islands.

Simple logo

Source: Flat monogram-style graphic.

After convert: 2–3 colors, dithering off, crisp letter edges.

Closest to tapestry-friendly blocks.

Flat graphic — good for tapestry-style graphs.

Choose a sample, adjust the stitch count and colors, then convert it. You can edit the graph before downloading your chart.

WHICH TOOL?

Choose the Right Crochet Chart Tool

A photo crochet graph answers one question: which color is this stitch? You can use that chart for tapestry-style colorwork, intarsia-like blocks, or a simple single crochet panel. The graph does not teach how to carry yarn, keep tapestry fabric stiff, or whether you should work flat or in the round — those are technique choices you make at the hook.

Use this converter to turn a photo into a chart for your colorwork project. For flat vs in-the-round modes and written color-run instructions, send the graph to the tapestry crochet pattern maker with Use for tapestry crochet. To draw without a photo, try the free crochet pattern generator. For open and filled lace meshes, use the filet crochet pattern generator.

Photo → graph (this page)Homepage graph makerFilet generator
Starting pointUpload or sample imageBlank grid or motif templateBlank mesh, name tool, or example
What each cell meansOne SC colorOne SC colorOpen or filled mesh
Best forPictures, logos, pet panelsHand-drawn colorworkLace windows and blocks

BEFORE YOU CONVERT

Photo to Crochet Pattern
FAQ

Find answers about photos, yarn colors, downloads, privacy, and what your chart includes. To get started, see how to convert a picture.
How do I turn a photo into a crochet pattern?

Upload a clear image (or load a sample), crop it, set stitches wide and max yarn colors, convert to a graph, tidy stitches and colors, then download PNG or PDF. The result is a colorwork chart for flat single crochet — not a full written toy pattern.

Is this photo to crochet pattern converter free?

Yes. Upload, conversion, graph editing, local saving, and PNG and PDF downloads are free. There is no account, subscription, or watermark on the chart.

Can I convert a picture into a crochet graph?

Yes. The converter samples your picture into stitches, reduces colors, and opens an editable grid. Each square is one single crochet stitch color (US terms).

Can I create a crochet pattern from a pet photo?

Often, when the face is large, well lit, and the background is simple. Use about 6 colors, crop tight, then clean eyes and outlines by hand after conversion.

How many colors should I use?

Fewer colors mean fewer yarn changes. Six is a practical default; try 2–4 for bold graphics and up to 12–16 only when you need finer shading and accept more ends.

Can I download my crochet pattern as a PDF?

Yes. The PDF includes an overview, color legend, stitch counts per color, and numbered chart pages. PNG exports a single overview image. Both are visual colorwork charts, not written row-by-row instructions. The on-screen row preview shows how many stitches to work in each color. Print PDFs at 100% for readable numbering.

Does this work for C2C crochet?

You can use the rectangular color chart as a reference, but it does not include diagonal row instructions or the increases and decreases needed for C2C crochet.

Is my photo uploaded to a server?

No. Your photo stays in your browser and is not sent to our servers. Only the resulting graph is saved in this browser; the original photo is not kept after you leave.

Can this generate an amigurumi crochet pattern?

No. It cannot turn a photo into a full 3D amigurumi pattern with shaping, parts lists, or assembly. It makes flat colorwork graphs you can crochet as panels, tapestry-style fabric, or similar projects you plan yourself.

Can I use this graph for tapestry or filet crochet?

For flat vs in-the-round modes and written color-run instructions, send the graph to the Tapestry Crochet Pattern Maker with Use for tapestry crochet. Filet lace uses open and filled mesh, not multi-color squares—use the Filet Crochet Pattern Generator instead. To draw a color grid without a photo, open the free colorwork graph maker.

A photo in. A graph you can edit.

Crop, reduce colors, fix stitches, and print the chart.

Back to converter